An important part of creating a web page or site is crafting a good user experience. One thing I see too often is a missed opportunity for ease of use – no styling of attributes (or worse, no attribute use at all).
Styling attribute selectors can be done in your .css file, which means you can set it up once and then never worry about it again (or until your next re-design, anyway…).
By using the rel attribute on an HTML link, we’re giving it a way for the CSS to identify it. Take the following list of links, for example. Without any styling applied, it will look (more or less) like this:
Now, you can see that if it weren’t for the wording, you’d never be able to tell what the intent of the link is, and that is bad in terms of user experience.
So let’s see what happens when we use CSS and style these rel attributes!
1. Let’s remove the default bullet elements:
ul, ol {

list-style: none;

}
2. Then, let’s give our list elements some room to breathe.
  ul { display: block;}

li { padding: 5px 0; }
3. Then we’ll remove default styling for the links and put in the styles we want to have.
  a {

text-decoration: none;

font-weight: bold;

}

a:link {color: #1C5c89;}

a:visited {color: #21238E;}

a:hover {color: #1A8D59;}
4. Now comes the fun part. For internal links, we’ll give it a dotted underline:
  a[rel="internal"] {

border-bottom: 1px dotted #1A8D59;

}
5. Next, we’ll use the :after pseudo-element to help identify what kind of icon should be associated with each rel attribute. Note: If I don’t know what the baseline ems are for the site I’m working on, I’ll put my padding in px; but when you’re writing your own CSS, you’ll want to use ems or % instead of px!
  a[rel="external"]:after {

content: url("link to my external icon");

padding-left: 5px;

}

a[rel="redirect"]:after {

content: url("link to my redirect icon");

padding-left: 5px;

}

a[rel="email"]:after{

content: url("link to my email icon");

padding-left: 5px;

}

a[rel="pdf"]:after{

content: url("link to my pdf icon");

padding-left: 5px;

}

a[rel="doc"]:after{

content: url("link to my doc icon");

padding-left: 5px;

}
Here’s a screenshot of what the same list looks like after these css rules are applied:
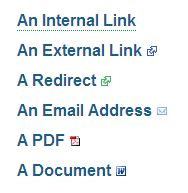
Much different! Once you’ve established the style for your site, your users will be much happier, since they will get a visual idea of your intent immediately.
You can also see this demonstrated on codepen and try it out for yourself: http://codepen.io/melsumner/pen/igAFb